Starting a garden can be both exciting and challenging. Today, gardeners everywhere are championing the use of raised bed gardening for some very good reasons.
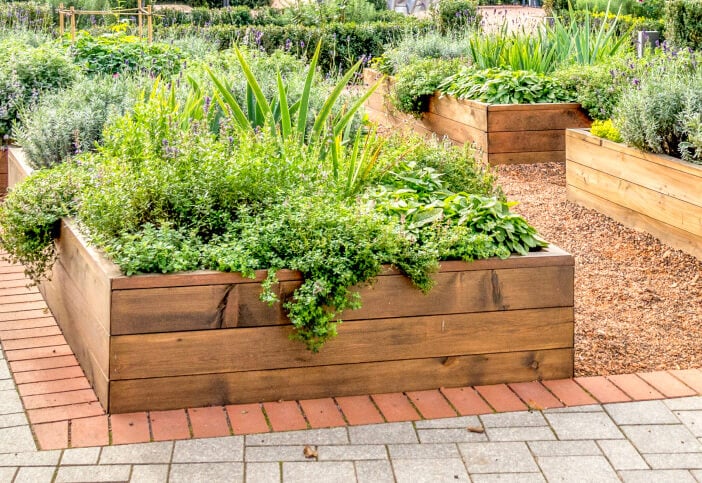
Backyard gardening is a wonderful pastime that’s growing in popularity. One of the best ways you can do it, is with a raised garden bed. That way, you can better manage soil quality, water flow, and pest control while making your plants more accessible. It also simplifies planting and harvesting activities. Overall, choosing a raised garden bed means gaining greater control over your gardening space.
In this guide, we'll walk you through creating your own DIY raised garden bed, step by step. Whether you're new to the wonderful world of gardening or an experienced green thumb, we’re here to help.
Materials and Tools You'll Need to Build a Raised Garden Bed
Materials:
- Wood: Opt for untreated, rot-resistant varieties like cedar or redwood. You’ll need boards for the sides and ends, typically 2x6 or 2x12 inches. Availability of wood is regional. Pine decays quickly; if you have to use treated lumber you can line the beds (especially for food production). Trade off of using cedar and redwood is long life.
- Screws: Exterior-grade screws (at least 3 inches) to securely assemble the wood. You can also use metal corner brackets to create the corners.
- Landscape Fabric: Prevents weeds from infiltrating your bed while allowing water drainage. In areas with gophers you can use "hardware cloth" a heavy duty mesh netting
- Soil: A rich mix of topsoil, compost, and organic materials to fill and nourish your bed.
- Mulch (optional): Helps maintain soil moisture and reduces weed growth.
Tools:
- Power Drill
- Saw
- Tape Measure
- Level
- Gardening Gloves
- Staple Gun (optional for securing landscape fabric)
- Wheelbarrow or Garden Cart (optional for moving soil)
Building Your DIY Raised Garden Bed
Just like in real estate, the number one rule for building your raised garden bed is location, location, location. Choosing the right spot ensures your plants will be happy and growing. It's essential the location you pick typically gets at least six to eight hours of direct sunlight each day—meeting the needs of most vegetables and flowers. Aim for an area that is clear of large trees or buildings that could cast shadows and reduce sun exposure. Outside fencing should also be a consideration.
In addition to sunlight, good air circulation and accessibility are vital. Proper drainage is another important consideration. Avoid areas that are prone to collecting standing water after it rains. The spot should also be easily accessible for you to water, weed, and harvest your plants comfortably.
What Shape Should the Frame Be?
Rectangle: they need to make sure that the width of the raised bed is not so wide that they can't reach the center area from either side length wise. Rule of thumb here is to build the raise bed with with the owners arm length in mind. When measuring the width out for the raised bed they will need to measure with their arms stretched out at a comfortable length for them to work on each side length wise. There is nothing worse than building a beautiful raised garden bed only to find out that you can't use the center most portion of your bed because you can't reach it.

Square: These are popular because they are easy to build, but like I stated above once they have built a 6'x6', 8'x8' or even a 10'x10' square raised bed they find out that they can't reach the center areas. If they chose to go with a square shape they need to add in a path in the center. See the pictures below.

Now, Let's Put It All Together
You can either build the frame for your raised garden bed at the spot you chose— a better option if it’s a larger frame—or build it off location and move it in place after it’s together. Wherever you build it, here’s a step-by-step guide for the construction:
- Measure and Cut: You’ll need four pieces of lumber (for example, 2x6s or 2x8s) cut to the length and width you want your bed to be. Most hardware stores will cut wood for you.
- Lay Out Your Materials: Put your pieces of wood on the ground to form a rectangle or square. This is your garden bed's outline.
- Screw the Corners Together: You'll need a drill for this. Place the end of one board against the side of another to form a corner. Use at least two long screws (3 inches or longer) to join them. Do this for all four corners until your frame is complete. (TIP – Treated lumber is dense and can be more difficult for screws. To make it easier, predrill the holes with a bit that’s a little smaller in diameter than the screws you are using.)
- Make It Stronger: If your bed is large (longer than 6 feet), you might want to add a couple of internal braces. Cut a piece of wood to fit inside the frame and screw it into place midway along the long sides. This keeps the sides from bowing out. You can also use metal straps on all the seams to keep the lumber tight as it expands and contracts from water and age.
It’s as simple as that! Now that it’s constructed, move it to the right spot.
How to Fill Your Garden Bed
After your frame is set in place, it’s time to fill it up. This may seem like a no-brainer step but before you start, there a few considerations:
Clear the Ground
Remove any grass, stones, or other debris where your bed will go. You can use a shovel or a hoe to scrape away the top layer.
Block Weeds
Lay down a layer of cardboard or landscape fabric on the cleared ground. This stops weeds from growing up into your garden but still lets water drain through.
Set Your Frame in Place
Carefully move your constructed frame onto the prepared area. Make sure it's exactly where you want it because it will be heavy once filled.
Fill with Soil
Pour in a mix of garden soil and compost until the bed is full. If you’re not sure what soil to use, ask at your local garden center. They can recommend a mix that’s good for your plants and area. Fill the bed nearly to the top, leaving a few inches of space. Quick Tip: Use older soil on the bottom or cheaper fill to save money but you need to make sure it's not still composting.
Water the Soil
Use a hose or watering can to wet the soil thoroughly. This settles it and prepares it for planting.
There you have it, you've built your first raised garden bed. Now, the real fun begins when you plant your seeds or seedlings! Remember, gardening is a process of learning and growing, much like the plants you'll soon be tending to.
If you have any questions on DIY home projects, repairs, or maintenance, it’s good to know that Frontdoor is here with Experts ready to help you via video chat.
Happy gardening!
Was this article helpful?

