We’re flush with tips on how to replace your toilet handle.
Get a grip.
Whether your toilet handle is broken, rusted, loose, or just outdated, replacing it is simple and straightforward. The hardest part might be picking out a new one. After that, it’s just a matter of removing a nut inside the toilet tank and replacing your old handle with a shiny new one. Here’s your guide to swapping out your toilet handle.
Grab handle that fits.
The part you’re looking for is called a toilet trip lever, and it includes the exterior handle plus the lift arm that goes inside the tank. Check to see where the handle is located—on the front, side, or at an angle. Some replacement handles are designed for specific mounting positions. Check your toilet’s brand and model number to find one that’s compatible. If you’re still not sure, take the old handle with you and ask a store employee.
Remove lid.
Spread a towel on the floor next to the toilet. Remove the porcelain tank lid and gently set it on the towel. Be careful—porcelain breaks easily.
Lift and separate.
Inside the tank, you’ll see a metal arm that extends from where the handle comes through. It connects to a chain attached to the flush valve or flapper. That’s what lets the water flow from the tank into the bowl, flushing the toilet. Most lift arms have at least three holes. Remember which one the chain is hooked to. Then disconnect the chain from the lift arm.
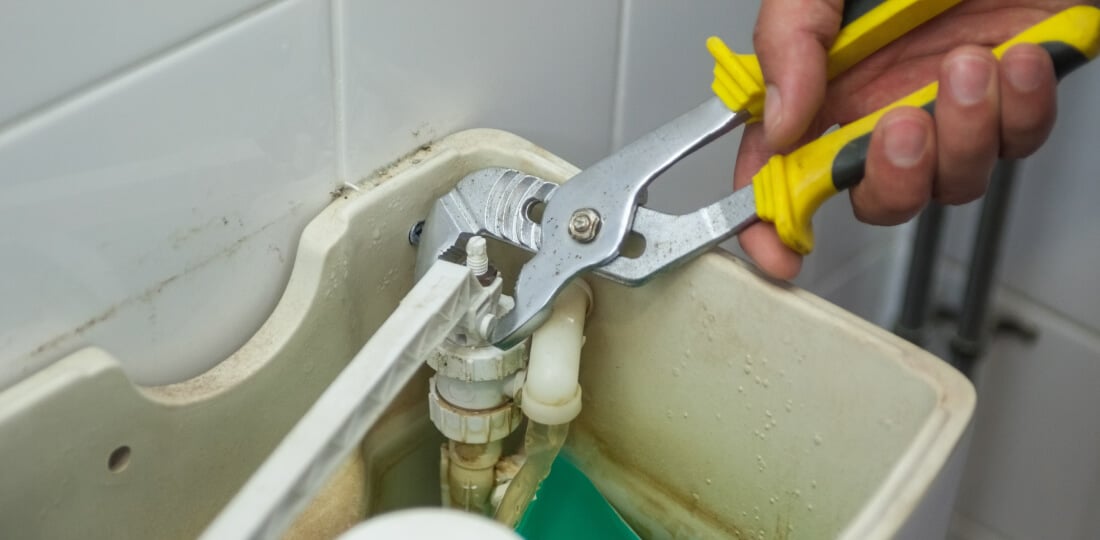
Off with the old toilet handle.
Use a crescent wrench to carefully loosen the nut that holds the handle in position. It should be threaded the opposite direction of most nuts, which means it has left-handed threads. Turn the nut clockwise—to the right—to loosen it. Don’t force the nut. You could crack the porcelain if you turn too hard the wrong way. Then you’ve got bigger problems than a faulty toilet handle. If the nut is stubborn, try a shot of WD-40.
On with the new.
Once you’ve removed the nut inside the tank, pull out the old toilet handle and lever arm. Simply pull the lever arm through the hole in the tank. Use soap and water to clean around the handle hole. Take the O-ring and nut off the new handle before installing it. Insert the lever arm through the hole, then put the rubber washer back on. Slide the nut back onto the lever arm and tighten it finger-tight. Use a wrench to carefully snug down the nut.
Reconnect the lift chain, and you’re done. Happy flushing!
Reattach the chain to the same hole as on the old lever arm. Test-flush a few times to make sure the valve opens and closes fully. If the chain is too short, the valve won’t close all the way and the toilet will leak; if it’s too long, the valve won’t open all the way and the tank won’t fully drain. Adjust the chain by clipping it to a different hole on the lever arm or by connecting a different link on the chain to the connector arm.
At Frontdoor, we know you love getting things done around the house. Staying in control of your to-do list is easier when you can keep the small things from turning into bigger—and more expensive—ones. We’re here to make it easier to prevent problems instead of reacting to them. We help you gain the peace of mind that comes with staying on top of your home’s health.
Want to learn more about updating or maintaining your bathroom or any other part of your home? Download the app if you haven’t already, and chat with a helpful, friendly Frontdoor expert.
Frontdoor assumes no responsibility, and specifically disclaims all liability, for your use of any and all information contained herein.
Was this article helpful?