Don’t let stained or cracked grout ruin the look of your tile floors.
Properly installed, tile will last for decades. And while grout can enhance both the look and lifespan of tile, when something goes wrong it’s most likely due to a grout problem.
Most grout is made with cement, a porous material that allows moisture to seep in over time, which leads to staining, cracking, loosening and the development of black mold. What starts out as a minor grout issue can ultimately threaten the integrity of the tile floor or wall.
Fortunately, whether you need to repair grout in the shower or grout a floor, refreshing and redoing old grout are fairly simple DIY projects.
Before you regrout, try to revive.
Before you attempt to replace grout, first see if you can restore the grout with cleaning products and elbow grease. Cleaning with the right mix of products, reconditioning, recoloring and sealing the color can go a long way toward returning your old grout to prime condition.
How to grout a floor.
If your grout is beyond reconditioning, you’ll need some tips on how to replace grout.
The first step in grout repair: Prep.
To keep from damaging the surface of adjoining tiles, lay down painter’s tape around the edge of each tile in the area where you’ll be working. Cover anything in the room you don’t want to get dusty. Wear protective gloves—and put on safety glasses while grinding to protect your eyes from dust and grout particles.
Get the old grout out.
If you’re removing grout from an area greater than around 30 square feet, you’ll probably want to use a power tool. A lightweight oscillating tool with a carbide grout removal blade is easy to control between tiles. For quarter-inch or narrower grout joints, you can use a tool called a grout rake with replaceable grout removal blades.
- Use a chisel or a flat-head screwdriver to scrape out edges and corners and remove stubborn bits from the grout line.
- Carefully press the oscillating blade into the grout line and move it in one direction until the grout starts to powder. You don’t need to remove it all for the new grout to set properly.
- Once you’ve removed the grout, brush out the powder and debris with a stiff-bristle nylon brush.
- Then vacuum up any remaining dirt and dust. Thoroughly wipe down the tiles with a wet cloth to pick up any loose grout, then let the tiles dry.
Grab your grout.
There are three main types of grout for tile joints:
Cement-based grouts are either sanded or unsanded. Both types can be used in most tiling projects. They need plenty of drying time to cure and maximize their strength and durability.
Sanded grout has a gritty look and feel and contains large grains of sand to bond the grout and avoid ending up with cracked grout. It’s durable and stable, which makes it a good choice for high-traffic areas. Best for grout seams at least an eighth-inch wide, it’s also the most affordable option.
Unsanded grout contains very fine mineral particles and has a smoother texture than sanded grout, with no noticeable grit. It’s stickier and easier to work with than sanded grout. It works best for grout seams between one-sixth and one-eighth inch wide, and it’s ideal for walls and other vertical surfaces. Unsanded grout shrink as it dries, and tends to crack over time.
Epoxy grout requires no mixing with water. It’s waterproof, durable, resists stains and shrinking, and doesn’t require sealing. It’s good to use on seams wider than an eighth-inch. And because it’s not porous like cement-based grout, epoxy is a good choice for backsplashes, showers and other wet areas, On the other hand, epoxy grout is harder to apply than cement-based grouts because it dries quickly.
Stir it up.
- If you’re using cement-based grout, mix the recommended amount of water in a bucket with the grout powder.
- Using a drill with grout mixer attachment or a hand trowel, thoroughly mix half of the dry grout with half the amount of water until all the powder is dissolved.
- As you stir, gradually add more water and powder until you achieve the consistency of smooth peanut butter without any lumps.
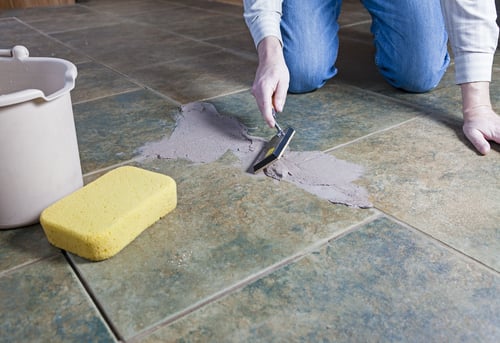
Put it down.
Load a good amount onto a grout float and spread it diagonally over a small area, pressing it into the gaps between tiles for a smooth, consistent grout line.
Wipe it off.
- Use the spreader to get a neat edge.
- Work in one area at a time and as quickly as you can before the mixture starts drying up.
- Keep track of how quickly you wipe off the excess grout and its drying time to minimize the amount you’ll need to remove later.
Let it cure.
- Once you’ve filled all the gaps between tiles with grout, go over the tiles with a damp sponge to smooth down the lines and compact the grout.
- Let the grout dry to a haze, then repeat the process with clean water to pick up residue.
- Wait at least 48 hours for the grout to cure, then buff the tiles with a dry cloth.
Seal it up.
Use a thin-tipped applicator or a sponge to seal the grout, protecting it from developing cracks, breaks and bacteria buildup. After about 10 minutes, wipe off the sealant. Then re-apply it at least once a year.
At Frontdoor®, we know you love getting things done around the house. Staying in control of your to-do list is easier when you can keep the small things from turning into bigger—and more expensive—ones. We’re here to make it easier to prevent problems instead of reacting to them. We help you gain the confidence and satisfaction that come with staying on top of your home’s health.
Want to learn more about repairing tile grout, how to grout a floor, or anything else about tile flooring—or any other gadgets in your home? Download the app if you haven’t already, and chat with a helpful, friendly Frontdoor Expert.
Was this article helpful?