A step-by-step guide to help you properly install a gas dryer.
While it’s more energy-efficient to dry your clothes with gas than electricity, it takes a little more energy to install a gas dryer line and install a gas dryer. But as long as your home has a gas dryer hookup, you have the right tools and you follow a few basic steps and precautions, you should be able to tackle the job yourself.
Before getting started, we recommend that you refer to the installation instructions and safety guidelines that came with your specific model and get professional help if you are unsure of any steps.
First things first: Make sure gas can come in and exhaust can go out.
Your gas dryer needs an appropriate gas dryer hookup; there should be a gas supply valve in the room where you install the machine—preferably within six feet of the unit. If there’s no gas pipe near where the dryer will go, have a technician install one.
The exhaust vent on your dryer should fit the opening in the laundry room wall. If not, buy a vent adapter or transition pipe at your local hardware or home supply store. Loosely attach the vent clamp to the vent and connect it to your dryer exhaust, then secure it in place with a screwdriver.
Check the dryer’s electrical voltage and make sure it’s compatible with your home’s service. Most new gas dryers are 120-volt, and some older homes are wired for 110. Go to your circuit breaker and make sure you have two columns of 120 volt circuits.
Give it the gas: how to install a gas dryer line.
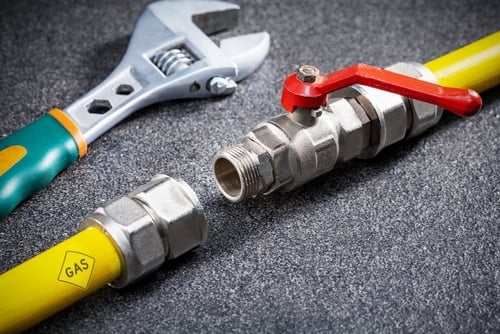
Hook up the gas supply.
- First, turn off the breakers at the main breaker panel in the garage or basement.
- Then use an adjustable wrench to turn off the gas either at the supply valve for the dryer’s gas pipe or at the main gas service shutoff valve.
- Attach the wrench to the valve handle and turn until the handle is perpendicular to the gas pipe.
Apply pipe thread compound.
To prevent gas leaks, you need to create a good seal between the pipe components.
- Before connecting the dryer to the gas pipe in your wall, coat all threaded connecting pipe ends with a pipe thread compound.
- Look for a product designed for use with liquid petroleum gas (LPG).
Attach a pipe connector to the dryer.
Flexible pipe connectors with stainless steel fittings may be included with your dryer. If not, you can buy them.
- Fasten one to the gas pipe on the dryer. You may need an adapter to attach the three-quarter-inch end of the pipe connector to the three-eighths-inch pipe end on the dryer.
- Make sure the connector is long enough to reach the pipe in the wall. Don’t re-use an old pipe connector.
Connect the gas dryer to the wall pipe.
Once the pipe connector is attached to the dryer pipe, connect the other end to the threaded valve component on the gas pipe in the wall. Use an adapter if necessary.
Tighten the connections.
Use a pair of adjustable wrenches to tighten the connections between all the gas line components. Be careful—overtightening can twist the pipes or strip the threads.
Check for leaks.
Before you turn on the gas, make sure it’s safe.
- Mix equal parts water and mild dish detergent and lightly coat the connectors between each of the gas pipe components.
- Switch on the gas at the dryer supply valve.
- If you see bubbles forming on the connectors, turn off the gas, carefully re-tighten your connections, and try again.
Turn off the gas.
Shut the gas off again at the dryer supply valve and leave it off till you’ve finished.
Attach the exhaust vent.
Attach the vent hose.
There are two basic types of venting systems:
- Rigid metal tube: works best for floor-level vents
- Semi-rigid, flexible hose: best for above-floor vents.
Loosely place the vent clamp onto the vent and connect it to the dryer exhaust, then tighten with a screwdriver.
Check your outside duct opening.
Make sure it’s clear of lint and other debris that could create a blockage, and check that the vent hood is still in place.
Finish the gas dryer hookup.
Attach the power cord.
Clothes dryers are not equipped with a power cord upon purchase. This is because you need to ensure the number of prongs on the cord matches the slots available in your home's dryer receptacle. Older homes typically have three-slot receptacles, while newer homes have four-slot receptacles.
You’ll also need what’s called a strain relief clamp. This attaches to the opening and snugs down around the cord, keeping the wire connections inside the appliance from coming loose if the cord is tugged. The rounded edges of the clamp keep the casing from cutting into the cord sheathing from any back-and-forth movement.
- Open the terminal block access cover and attach the ends of the power cord to the appropriate terminals.
- Secure the ends of the power cord and the strain relief clamp with the screws and replace the terminal cover.
Slide the dryer in place.
Keep the back of the machine a few inches away from the wall. If you’re using a flexible or semi-rigid exhaust vent hose, be careful not to crush the hose between the dryer and the wall.
Level it.
Get a level and check it side to side and front to back, at all four corners, and at the center. Adjust the legs if needed.
Turn the breakers and gas back on.
You should now be ready to use your new dryer. And now you know how to install a gas dryer line and how to hookup a gas dryer. If you need more help hooking up your gas dryer, contact Frontdoor today.
When you set out to install a gas dryer, there are certain steps that you need to follow to do the job correctly and safely. When you want to keep little problems around the house from becoming big, expensive ones, there are certain steps to follow too. Step one: if you haven’t already, download the Frontdoor® app to pick up a wide array of helpful DIY tips and chat with one of our knowledgeable experts. Step two: learn the added benefits of Prime and Premium membership.
Was this article helpful?