We’re bursting with helpful tips on connecting washer hoses.
You have someone install a washing machine, then you start using it to keep your family’s clothes clean. End of story.
Until the day you go down to the laundry room and find yourself sloshing through a couple of inches of water.
So what happened? Well, it could be that a small, overlooked piece of equipment—one of your washing machine’s supply hoses or the drain hose—has failed. If you think about the amount of water that passes through them, it’s no wonder they eventually wear out and cause minor catastrophes.
Even the strongest hoses burst over time. Washing machine hose replacement is recommended by most manufactures because damage caused by faulty hoses can cost thousands of dollars.
The good news is that washing machine hoses are inexpensive and easy to replace.
Know the different kinds of washing machine hoses.
The drain hose (usually a gray color) carries wastewater out of the machine to the washer drain, while the hot (red) and cold (blue or black) water supply hoses bring clean water in.
Supply hoses connect your machine to the valve that supplies water for each wash cycle. Bursting supply hoses are one of the most common causes of water damage, so they need to be properly installed and maintained to stay intact and functional.
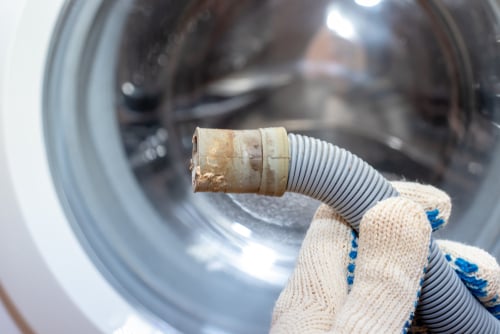
Drainage for a washing machine is a critical part of maintenance. The drain hose should be replaced about every five years, even if it looks like it’s still in good shape. You may not notice the damage and deterioration on the outside till it cracks and bursts.
Why washing machine hoses fail.
- Wear and tear
All washing machine hoses experience normal wear and tear caused by high water pressure and a hydraulic shock known as a water hammer, which increases water pressure in the hoses after each cycle.
- Poor water quality.
Hard water can corrode the inside of the washing machine hoses, letting sediment build up.
- Improper washer hookup.
A leak can form in a hose connector that isn’t correctly fitted and tightened. A hose can leak or burst if it’s twisted or bent during installation.
- Worn rubber washer.
A rubber washer sits at the end of the hose, sealing the supply valve and keeping water from leaking out. Over time, it wears down wear down and loosens, letting water leak through.
Types of supply line hoses.
Washing machine hoses are typically made of one of three materials:
- Rubber hoses are the least durable, losing much of their flexibility and strength over time, resulting in corrosion, cracks and leaks or busted hoses.
- Reinforced rubber is reinforced with either polyester mesh or braided rayon to protect the material from withering.
- Braided stainless steel—the industry standard—uses a rubber hose encased in a strong, flexible stainless steel braid that protects the hose from damage.
Find the problem.
If water is shooting out from behind or beneath the washing machine during the wash or rinse cycle, the drain hose has ruptured or broken free from the drainpipe. You might also hear the washer finish running through its cycle, but your clean clothes are sitting in a pool of water that didn’t drain.
Turn off the washer.
If water is spurting or leaking from the washer, shut down the machine. Unplug it, but don’t drop the plug into standing water.
Turn off the water.
There should be a pair of faucet handles at the back of your washer installation. Turn them both all the way to the right.
Connecting washer hoses.
Let’s start with the intake hoses.
- Turn off your home’s water supply.
- Run the washer for a few minutes to drain any residual water from the hoses so there’s no spill when you unhook them.
- Unplug the washer and nudge it out from the wall. You’ll see three hoses. The large one is the drain hose, the two smaller ones are the intakes for hot and cold water.
- Grab a bucket and put it under the connection to catch any water that runs out.
- Remove the old washer hoses with a pipe wrench. Then take your replacement hoses, making sure the rubber washers are placed correctly in the connectors, and hook them up.
- Tighten all four connections till they’re snug. Then turn the water supply back on and slowly turn on the hot and cold water, checking for leaks.
Now for the drain hose.
- The drain hose, which provides drainage for the washing machine, is attached to the back of the washer by a clamp. Hold the clamp your pliers as you unscrew it, then pull the drain hose away. If the clamp’s in good shape, you can re-use it, but the new hose probably came with clamps.
- Slide the clamp on the replacement hose and place it at the washer drain opening. Find where the hose rests on the connector and tighten the clamp till it’s fairly snug. Repeat the process at the other end of the hose.
- Push the washer back into place, leaving at least four inches between the machine and the wall so the hoses don’t kink. Then reconnect the power and water and it is time to do a test wash to make sure there are no leaks.
- Now that you’re finished connecting washer hoses, you’ll just need to check them periodically for leaks, and replace them immediately if you see any signs that they’re wearing out.
Want to learn more about connecting washer hoses, installing a washing machine, or anything else about installing, maintaining and repairing major household appliances? Download the Frontdoor® app if you haven’t already and pick up some helpful DIY tips or talk with one of our friendly experts. And discover the additional benefits of Prime membership.
At Frontdoor, we’re here to make it easier to prevent problems instead of reacting to them. We can help you gain the confidence and satisfaction that come with taking care of any issues that pop up around the house.
Was this article helpful?